back to db page
Targets
 First, please understand, I'm NOT selling
targets. I have to make a bunch of them for Standing Stone 4.
I've designed a few mechanisms. This one is simple, resists alot
of energy, and can be made from readily available parts. I cut
mine from sheet steel with a small plasma cutter. You can jig
or band saw them, torch them, or make them from plywood, and armor
around the kill zone.
Clearly, you have to have some tools
and some ability to think thru stuff like this, however; you should
not have too much trouble converting this idea to a wooden base
and face (if you need to) or making small alterations for your
needs.
The key things to buy are 8" Tee
hinges. I got mine at Lowes - huge home centers in this region.
Also just picked up the light extension spring there. Makes a
self base and the strong double joints you need.
I post this in the hope it may help
individuals or clubs come up with the targets needed to enjoy
their sport / hobby. The weight of the Tee hinges will determine
how much energy the things will take without bending up. This
paddle will show slight bending at the kill zone area at about
40 fpe from 25 caliber buckshot. (Easily straightened by hammering
after a long session - or just use heavier stuff in the first
place). I don't think the normal 20 fpe FT guns would phase it.
Enjoy. ;?)
First, please understand, I'm NOT selling
targets. I have to make a bunch of them for Standing Stone 4.
I've designed a few mechanisms. This one is simple, resists alot
of energy, and can be made from readily available parts. I cut
mine from sheet steel with a small plasma cutter. You can jig
or band saw them, torch them, or make them from plywood, and armor
around the kill zone.
Clearly, you have to have some tools
and some ability to think thru stuff like this, however; you should
not have too much trouble converting this idea to a wooden base
and face (if you need to) or making small alterations for your
needs.
The key things to buy are 8" Tee
hinges. I got mine at Lowes - huge home centers in this region.
Also just picked up the light extension spring there. Makes a
self base and the strong double joints you need.
I post this in the hope it may help
individuals or clubs come up with the targets needed to enjoy
their sport / hobby. The weight of the Tee hinges will determine
how much energy the things will take without bending up. This
paddle will show slight bending at the kill zone area at about
40 fpe from 25 caliber buckshot. (Easily straightened by hammering
after a long session - or just use heavier stuff in the first
place). I don't think the normal 20 fpe FT guns would phase it.
Enjoy. ;?)
 You see how the hinge arm is shaped
to be the lock bar for this "sear" design and also the
kill paddle behind the kill zone hole. You can figure where the
hole is there behind the section that's laying flat against the
back of the target face.
You see how the hinge arm is shaped
to be the lock bar for this "sear" design and also the
kill paddle behind the kill zone hole. You can figure where the
hole is there behind the section that's laying flat against the
back of the target face.
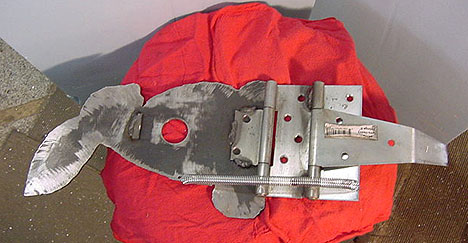 Note that the one Tee hinge leg was
sawed off and welded to the target face. If you made yours from
wood, you could leave more of that leg and screw it onto the back
of the face.
Note that the one Tee hinge leg was
sawed off and welded to the target face. If you made yours from
wood, you could leave more of that leg and screw it onto the back
of the face.
 You see how the two hinges were welded
together here to make the integral base. OR, you could screw both
hinges (in this orientation) to a heavy 2 by 10 wooden base and
not even weld them.
You see how the two hinges were welded
together here to make the integral base. OR, you could screw both
hinges (in this orientation) to a heavy 2 by 10 wooden base and
not even weld them.
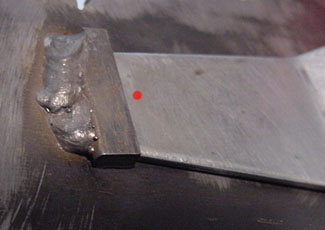 The "Sear Shelf" is welded
to the back of the face. The top of the sear lever locks under
here to hold it upright against the slight spring tension. Just
make sure your shelf is NOT angled so it jams tighter by capturing
the paddle as it tries to back out from under the shelf. For a
wooden version, consider a section of small angle iron (1/2"
by 1/2" about 5" long) and screw (or stove bolt) about
two on each side of the paddle section.
I put the red dot on there to show
you where I'd put an adjustment screw and lock nut thru the face.
The screw could be adjusted so as to limit the depth engagement
of the sear bar under the shelf - making it easier to disengage
when hit thru the kill zone hole.
This target falls completely flat -
like it was hit by a train! A string thru an oversized smooth
edged hole in the face, and then going to the locking bar (about
half way up) would allow you to reset it from the shooting line.
I use the nylon Mason's strings on rewind spools - Lowes again.
For my targets at Standing Stone, I
refresh the kill zones with paint in order to have a "jury"
regarding the individual's hits. Thus - I just reset the field
manually as I score and paint them. Saves having a tangle of 30
strings ... ;?)
Good Luck! Have fun ...
Gary
The "Sear Shelf" is welded
to the back of the face. The top of the sear lever locks under
here to hold it upright against the slight spring tension. Just
make sure your shelf is NOT angled so it jams tighter by capturing
the paddle as it tries to back out from under the shelf. For a
wooden version, consider a section of small angle iron (1/2"
by 1/2" about 5" long) and screw (or stove bolt) about
two on each side of the paddle section.
I put the red dot on there to show
you where I'd put an adjustment screw and lock nut thru the face.
The screw could be adjusted so as to limit the depth engagement
of the sear bar under the shelf - making it easier to disengage
when hit thru the kill zone hole.
This target falls completely flat -
like it was hit by a train! A string thru an oversized smooth
edged hole in the face, and then going to the locking bar (about
half way up) would allow you to reset it from the shooting line.
I use the nylon Mason's strings on rewind spools - Lowes again.
For my targets at Standing Stone, I
refresh the kill zones with paint in order to have a "jury"
regarding the individual's hits. Thus - I just reset the field
manually as I score and paint them. Saves having a tangle of 30
strings ... ;?)
Good Luck! Have fun ...
Gary